October 4, 2026
Best Lighting for Telehealth and Video Consultations
A clear video consultation doesn’t require a studio. But when your face looks dim, washed out, or uneven, lighting for telehealth and video consultations can feel like one more thing to figure out before the call. The right setup often starts with where you sit, not with another piece of gear.
It makes sense to wonder whether a desk lamp, ring light, or room light is enough. Glare, shadows, and changing daylight can affect how you look on camera, even when your setup seemed fine yesterday. A few deliberate adjustments can make your face easier to see without turning your room into a production set.
This guide covers how to use the light you already have, where to place it, and when a desk lamp or other room lighting could help. You’ll also learn how to make your setup more consistent from call to call. Keep it simple, make it yours, and let the work stay at the center.
Key Takeaways
- Learn why even, readable light helps you come across clearly on camera without a dramatic studio setup.
- Understand how light direction, color, and camera position can change the way your image looks.
- Compare window light, overhead lighting, desk lamps, and ring lights to find an option that fits your space.
- Use a practical setup process to test your camera view and make small adjustments before a consultation.
- Build lighting for telehealth and video consultations around your room, desk position, and usual daylight.
Why lighting for telehealth and video consultations changes how clearly you come across
Lighting for telehealth and video consultations means arranging the light in your space so your face is easy to see on camera. The aim isn’t to recreate a studio. It’s to reduce distracting shadows and sudden changes in brightness.
You might see comfortably in the room and still look dim on screen. Your eyes adjust to the space around you, but the camera has to balance the light in the whole frame. A bright window or lamp behind you can make the camera expose for the background, leaving your face darker. Shifting daylight or a change in camera position can alter the image, too.
What makes a face look clear on a video call?
Start with direction. Light coming from in front of you can make your features easier to see, while a source far to one side may cast a stronger shadow across your face. A window behind you can create backlighting, making the background bright and your face look dim. Before adding another light, try turning your chair or changing the camera angle. The camera’s automatic exposure and changing room light can also affect the image.
Why telehealth lighting should feel natural, not staged
A consultation setup should help you look visible and approachable, not as if you’ve borrowed a film set. Even light is usually more useful than dramatic contrast or a bright halo. The right arrangement depends on your room, desk position, and what feels comfortable. Keep the goal modest: a clear view of your face that stays reasonably consistent through the call.
Professional video often uses three-point lighting, which separates light into key, fill, and back lights. Think of it as a framework, not a shopping list. For a home consultation, start with one well-placed source and the room light you already use. A desk lamp or broader room lighting may help, depending on where shadows fall and how much daylight reaches your space.
Check the camera preview before the call. If one side of your face disappears into shadow, shift your position or the light. If the background looks brighter than you, turn away from the window or adjust the camera angle. For options that fit your room, explore workspace lighting options. A considered setup should work with your space, not ask your space to become something else.
How light direction, color, and camera placement shape your image
Brightness describes how much light reaches the scene; light quality and direction shape how that light appears on camera. A bright source can still create glare, harsh shadows, or uneven color. For lighting for telehealth and video consultations, look at the whole frame: your face, the direction of the light, and what the camera is trying to balance.
Color temperature describes whether light looks warmer, with a yellow cast, or cooler, with a blue cast. Color rendering is how naturally a light source shows colors, including skin tones. Glare is unwanted reflected brightness, which can show up on glasses or nearby surfaces. Light direction means where the light comes from in relation to you and the camera. These qualities work together, so adding brightness isn’t always the fix.
How to use window light without fighting it
When practical, face a window or keep it slightly to one side rather than directly behind you. Daylight shifts as clouds pass and the sun moves, so a setup that looks balanced in the morning may look different later. If the color changes noticeably during a call, daylight and nearby artificial light may be competing. Turn off one source and check the camera preview again before changing anything else.
If you move your chair or desk to make better use of daylight, review the image from the camera’s actual position. A small change in the room can alter the balance of light across your face on screen.
How camera height and room light affect shadows
Camera height changes the angles visible in the frame, including where shadows fall across your face. An overhead ceiling light shines down and may create shadows around the eyes. A light closer to the camera’s direction can fill those areas more evenly. Neither arrangement works the same in every room. Adjust the camera and light a little at a time, then compare the preview.
Several light sources can make the image harder to balance, especially if daylight looks cool while a nearby lamp looks warm. Turn off one source and see whether the color and shadows look more consistent. If you wear glasses, watch for reflections and shift the light slightly to one side instead of aiming it straight at the lenses. The official telehealth lighting guide also covers practical ways to manage lighting and glare during virtual care.
If you’re considering a change to your workspace lighting, get in touch with Ergovanta.
Desk lamp, ring light, or room lighting: compare options for consultations
The best light source is the one that fits your room and gives you a view you can repeat. Window light may be enough for a daytime call, while a desk lamp can help when daylight fades. A ring light is another option, not a requirement. Judge the result in your camera preview rather than assuming one type of light will suit every setup.
| Light source | Placement flexibility | Room impact | Ease of adjustment |
|---|---|---|---|
| Window light | Limited by your desk and window positions | Uses existing daylight, but can change through the day | Adjust your chair or curtains, then check again as daylight shifts |
| Overhead lights | Usually fixed in place | Brightens the room, though it may cast shadows from above | Often adjusted at the switch rather than repositioned |
| Desk lamps | Can be placed near the desk and angled toward you | Adds light close to your work area without changing the whole room | Easy to reposition if shadows or glare appear |
| Ring lights | Can be placed near the camera | Adds a distinct light source in the camera-facing area | Can be adjusted, though reflections may bother some people |
When a desk lamp can support your video-call setup
If daylight is limited, a desk lamp gives you another source to work with. Place it in front of you and slightly to one side, then angle it so the light reaches your face without shining into the camera. If you notice a strong shadow or glare on your glasses, shift the lamp and check the preview again. Browse desk and workspace lighting as you consider what could fit your setup.
When room lighting or a ring light may make more sense
Ceiling lights and floor lamps can brighten the room, which may help when a small lamp leaves the background or surrounding space very dark. Their placement is less flexible, so first check how the existing light looks from the camera’s point of view. A ring light may suit a desk where a light can sit near the camera, but glasses can catch reflections. Adjust its position instead of adding brightness by default. Room-level options include floor lighting.
Let your room, available daylight, and usual consultation times guide the choice. If your calls happen at different times of day, test the setup under those conditions. Lighting for telehealth and video consultations doesn’t depend on owning a ring light or having a dedicated office. Start with what’s in the room, then add a light only if the camera view shows a clear need.
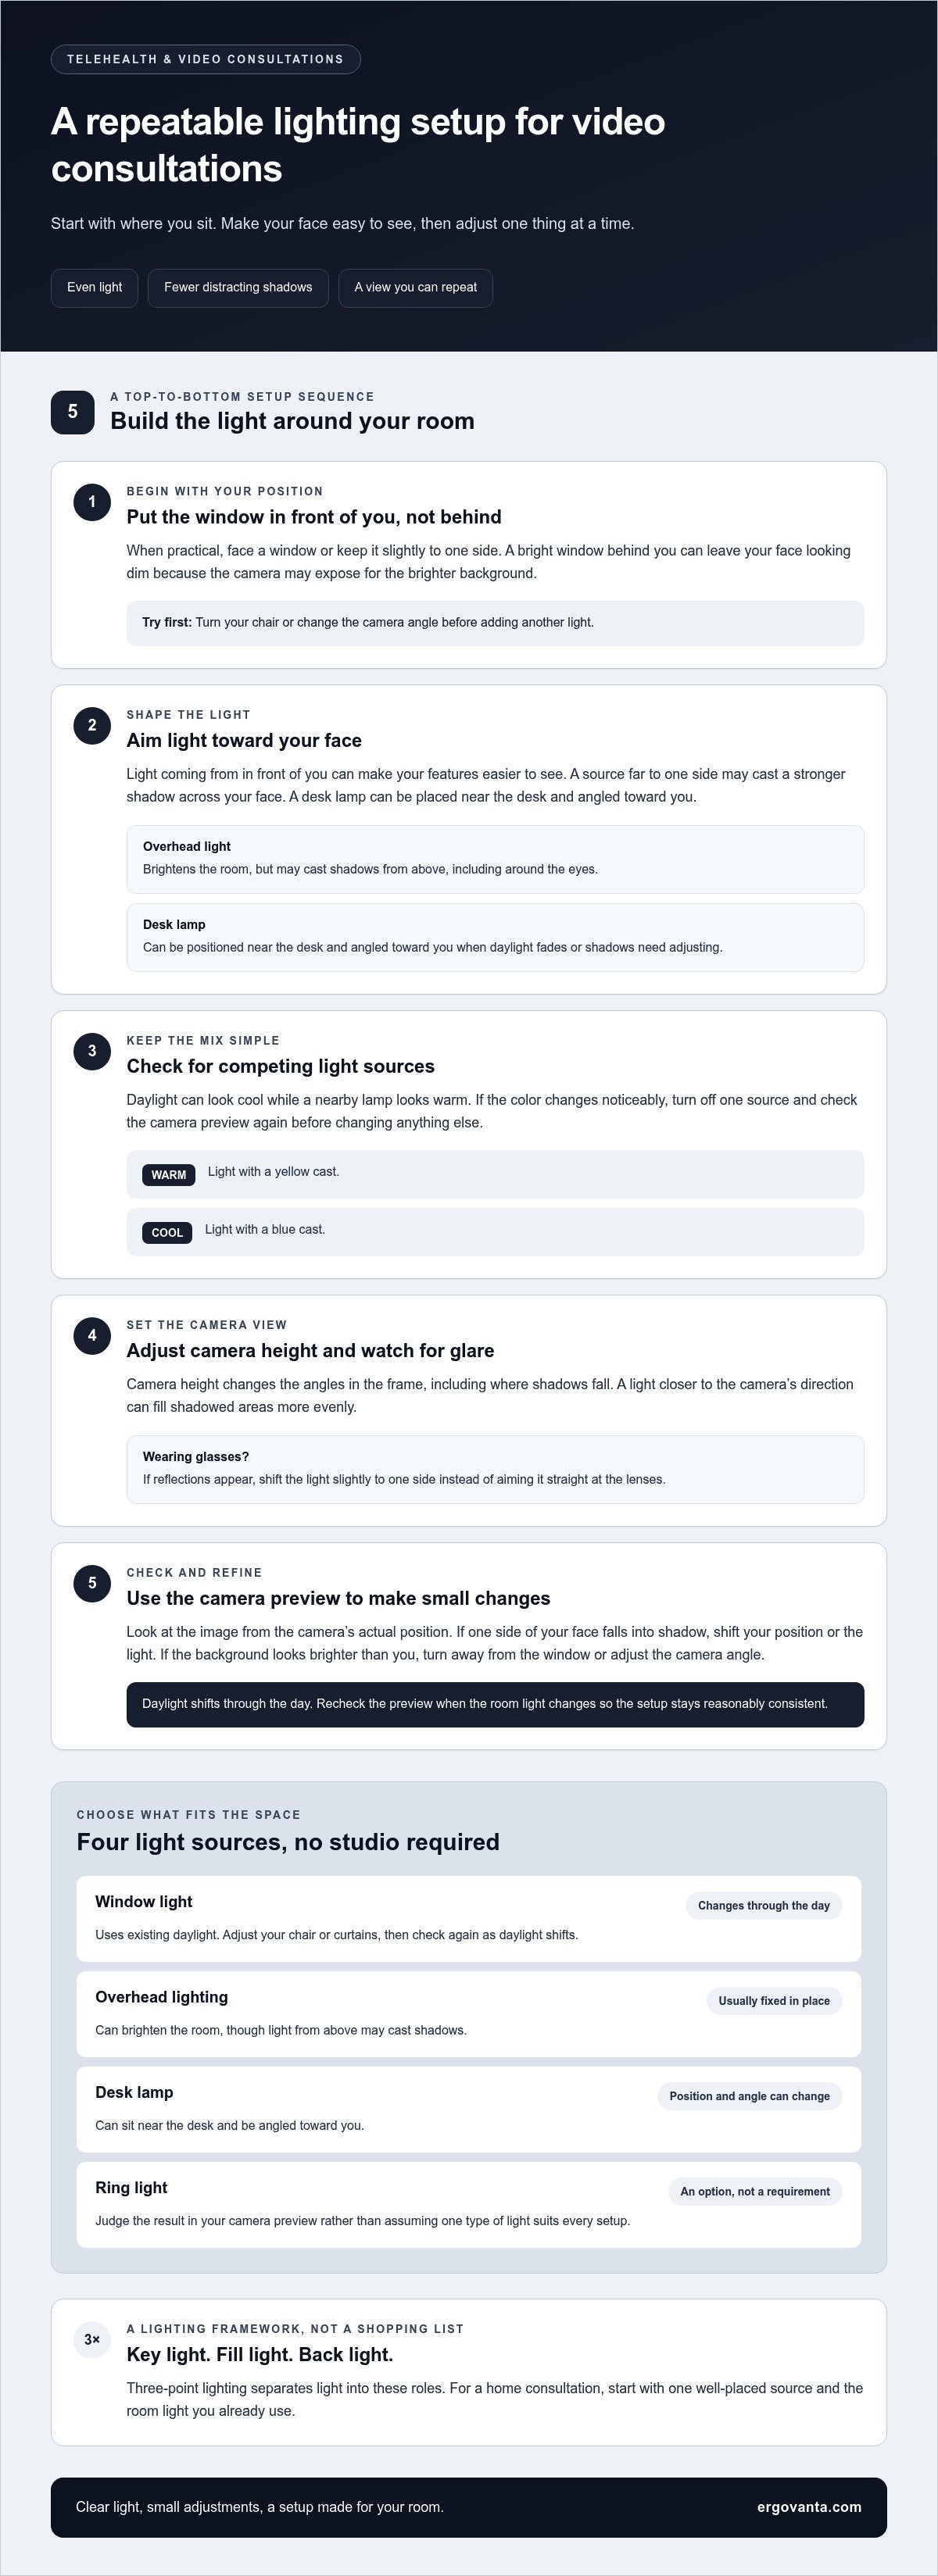
Set up and test lighting for telehealth in five practical steps
A quick camera check can save you from adjusting a lamp mid-consultation. Start with your current room and camera. Lighting for telehealth and video consultations is easier to refine when you change one thing at a time and review the result on screen.
Start with the camera, then adjust your seat, light, background, and final details.
- Step 1: Check the camera view. Open your video preview and set the camera at a comfortable viewing height. Make sure your face is clearly framed, then check the light and background as they appear on screen. The camera view is your reference, not how the room looks from across the desk.
- Step 2: Adjust your seat and position. If practical, turn toward the main light source, such as a window. Move your chair or camera in small increments and check how the shadows shift. Keep the camera at a height that feels natural to look toward during a conversation.
- Step 3: Reposition the light. If your face looks dim or one side is shadowed, first reduce strong backlighting by turning away from a bright window or changing the camera angle. Then move a desk lamp or adjust the room light. Avoid pointing a lamp directly into the camera.
- Step 4: Check for glare and reflections. Look for bright spots on glasses, shiny surfaces, or your screen. If you see a reflection, shift the lamp to one side or slightly change the camera position. Make one adjustment, then review the preview again.
- Step 5: Test the background and timing. Check whether the background is brighter than your face or distracts from the frame. If daylight reaches your desk, test the setup at the time your consultations usually happen. Clouds and changing daylight can alter the image, so note what works and make a small adjustment when needed.
Keep the process simple. If moving the light solves the issue, there’s no need to add another. If changing your position creates a new shadow, use the preview to find a workable balance. A setup you can recreate matters more than a perfect-looking room that only works at one particular moment.
Build a repeatable consultation setup with lighting that fits your room
Build around the room you have, not an imaginary office with perfect daylight and unlimited desk space. If the room already looks balanced on camera, keep the existing lights and the setup simple. If your face looks dim in the preview, a task light may help, especially when your desk sits far from a window or your calls often happen after daylight fades.
Let the layout guide your choice. In a compact room, a desk lamp can add light near the camera without taking up space elsewhere. If your desk is against a wall or across from a window, try shifting your chair before adding a new source. A larger room may benefit from broader room lighting, while a daylight-filled space may need little more than a change in seating position. Match the setup to your consultation schedule, too. The light that works at midday may not be enough for an evening call.
Choose lighting that earns its place in your workspace
Think beyond the camera. A desk lamp may also help with reading or focused tasks, while floor, wall, and ceiling lighting can serve the room more generally. Choose based on what your desk and space need, not because a certain light appears in every video setup. Explore workspace lighting options as you consider which type could fit your room and routine.
Keep the setup simple between consultations
Once the camera view feels clear, note where you placed the lamp, which direction it faces, and how you framed the camera. You could jot this down or use a small mark on the desk as a reminder. It’s a tiny bit of housekeeping that can spare you the pre-call game of “why is my face suddenly a silhouette?”
Retest after moving furniture, changing the main light source, or shifting your desk. If daylight varies across your usual call times, check the camera view under those conditions and make a small adjustment rather than rebuilding the whole setup. The best lighting for telehealth and video consultations fits your room, supports your other desk routines, and is easy to repeat.
Build a setup you can rely on
Good lighting for telehealth and video consultations comes down to a few considered choices: face the main light when you can, check how shadows and glare appear in the camera preview, and adjust one thing at a time. A desk lamp may help when daylight is limited; existing room lighting may be enough when it already gives you a clear, balanced view.
Make the setup fit your room and the hours you use it. Note a useful lamp position and camera frame so you can recreate them for the next call. If daylight changes or you move furniture, take a moment to check the view again. No elaborate setup required, just light that works for your space.
Ergovanta offers desk, floor, wall, and ceiling lighting, along with monitor light bars, so you can choose options that fit your wider workspace, not just one video call.
Start with the light you already have. A few small adjustments can help you feel ready to show up clearly on screen.
Frequently Asked Questions
What is the best lighting for a telehealth appointment?
The best lighting is even light that makes your face easy to see on camera. Start by facing a window or placing a lamp in front of you, then check the video preview for shadows, glare, or a background that looks brighter than your face. Lighting for telehealth and video consultations doesn’t need to be elaborate. Use the room and lights you have, then adjust based on what the camera shows.
Should I face a window during a video consultation?
Facing a window is often a useful starting point if the room layout allows it. Daylight in front of you can make your face clearer, while a bright window directly behind you may leave your face looking darker on camera. Check the preview before your call. Clouds and the time of day can change daylight, so the camera view may look different later than it did earlier.
Can I use a desk lamp for telehealth calls?
Yes. A desk lamp can help if daylight is limited or room lighting leaves your face dim. Place it in front of you and slightly to one side, then angle it toward your face without aiming it into the camera. Check the preview for shadows or reflections on glasses. Move the lamp in small increments and review the image after each adjustment. Your existing room light may already be enough.
Is a ring light necessary for video consultations?
No. A ring light isn’t necessary for a clear consultation. Window light, room lighting, or a desk lamp may work well, depending on your space and call schedule. A ring light can sit near the camera, but it may create reflections on glasses. Use the camera preview to compare it with your current setup. Choose the simplest arrangement that keeps your face visible without adding glare.
How do I avoid shadows on my face during a video call?
Place the main light in front of you or slightly to one side, rather than behind you. If overhead light creates shadows around your eyes, try a lamp closer to the camera’s direction. Adjust the light or your chair a little at a time, checking the preview after each change. If your face looks dark while the background is bright, reduce the backlighting before adding another light.
What color light is best for video consultations?
A neutral white light can be a useful starting point for video consultations. If your lamp has a color-temperature setting, the 4000K to 5000K range can help you compare neutral-looking options. The room’s daylight and other lights affect how color appears on camera, so aim for one dominant light color rather than mixing a cool window with a warm lamp. Check the preview and adjust if your face looks unusually yellow or blue.
Disclaimer
Ergovanta publishes these guides to help people set up better workspaces. Product recommendations reflect what we sell. Specifications, prices and availability are accurate at the time of writing and may change. Nothing here is medical, ergonomic or professional advice; if you have a specific health concern about your workstation, speak to a qualified professional.
From the catalog