October 19, 2026
How to Layer Lighting in Your Home: Architectural Principles That Work
One overhead light can make a room visible without making it work. If corners feel dim, reading feels uncomfortable, or the room looks flat after dark, you may be relying too much on one source. Learning how to layer lighting in your home starts with giving each light a clear purpose, not putting a fixture in every corner.
A ceiling fixture, floor lamp, wall light, and desk lamp can all help, but their roles depend on where they sit and what you do in the room. The goal is a balance of useful light and atmosphere that fits your routines.
This guide explains ambient light for the room as a whole, task light for focused activities, and accent light for details you want to draw attention to. You’ll learn how to plan placement around furniture and daily activities, then adjust the effect with the lights you already have. A thoughtful move or change in direction can make a noticeable difference before you buy anything new.
Key Takeaways
- Learn how to layer lighting in your home by matching each source to a clear purpose and a useful spot.
- Map daylight, room shape, furniture, and dim areas before deciding what the room needs.
- Compare fixture types by role, then choose placement that suits the room’s layout.
- Test the lighting during everyday activities and adjust one source at a time to reduce glare or dark spots.
- Start with one room: keep what works, reposition what doesn’t, and add only what’s missing.
What Does Layering Lighting in Your Home Actually Mean?
Light layering combines sources with different purposes and placements so a room can support more than one activity. Instead of asking a single ceiling fixture to do everything, consider how light reaches the room, where focused visibility matters, and which details you want to bring forward. The arrangement should respond to the room’s layout, not follow a fixed shopping list.
Light layering is the practice of combining general, focused, and highlighting light to suit a room’s layout and activities.
That’s the practical idea behind architectural lighting design, which often incorporates layers of light. The sources don’t need to match or be switched on together. They need to work as a considered set. A ceiling light might make it easier to move through a room, while a lamp helps with a specific task. Layering is less about counting fixtures and more about giving each one a job.
Ambient, task, and accent lighting have different jobs
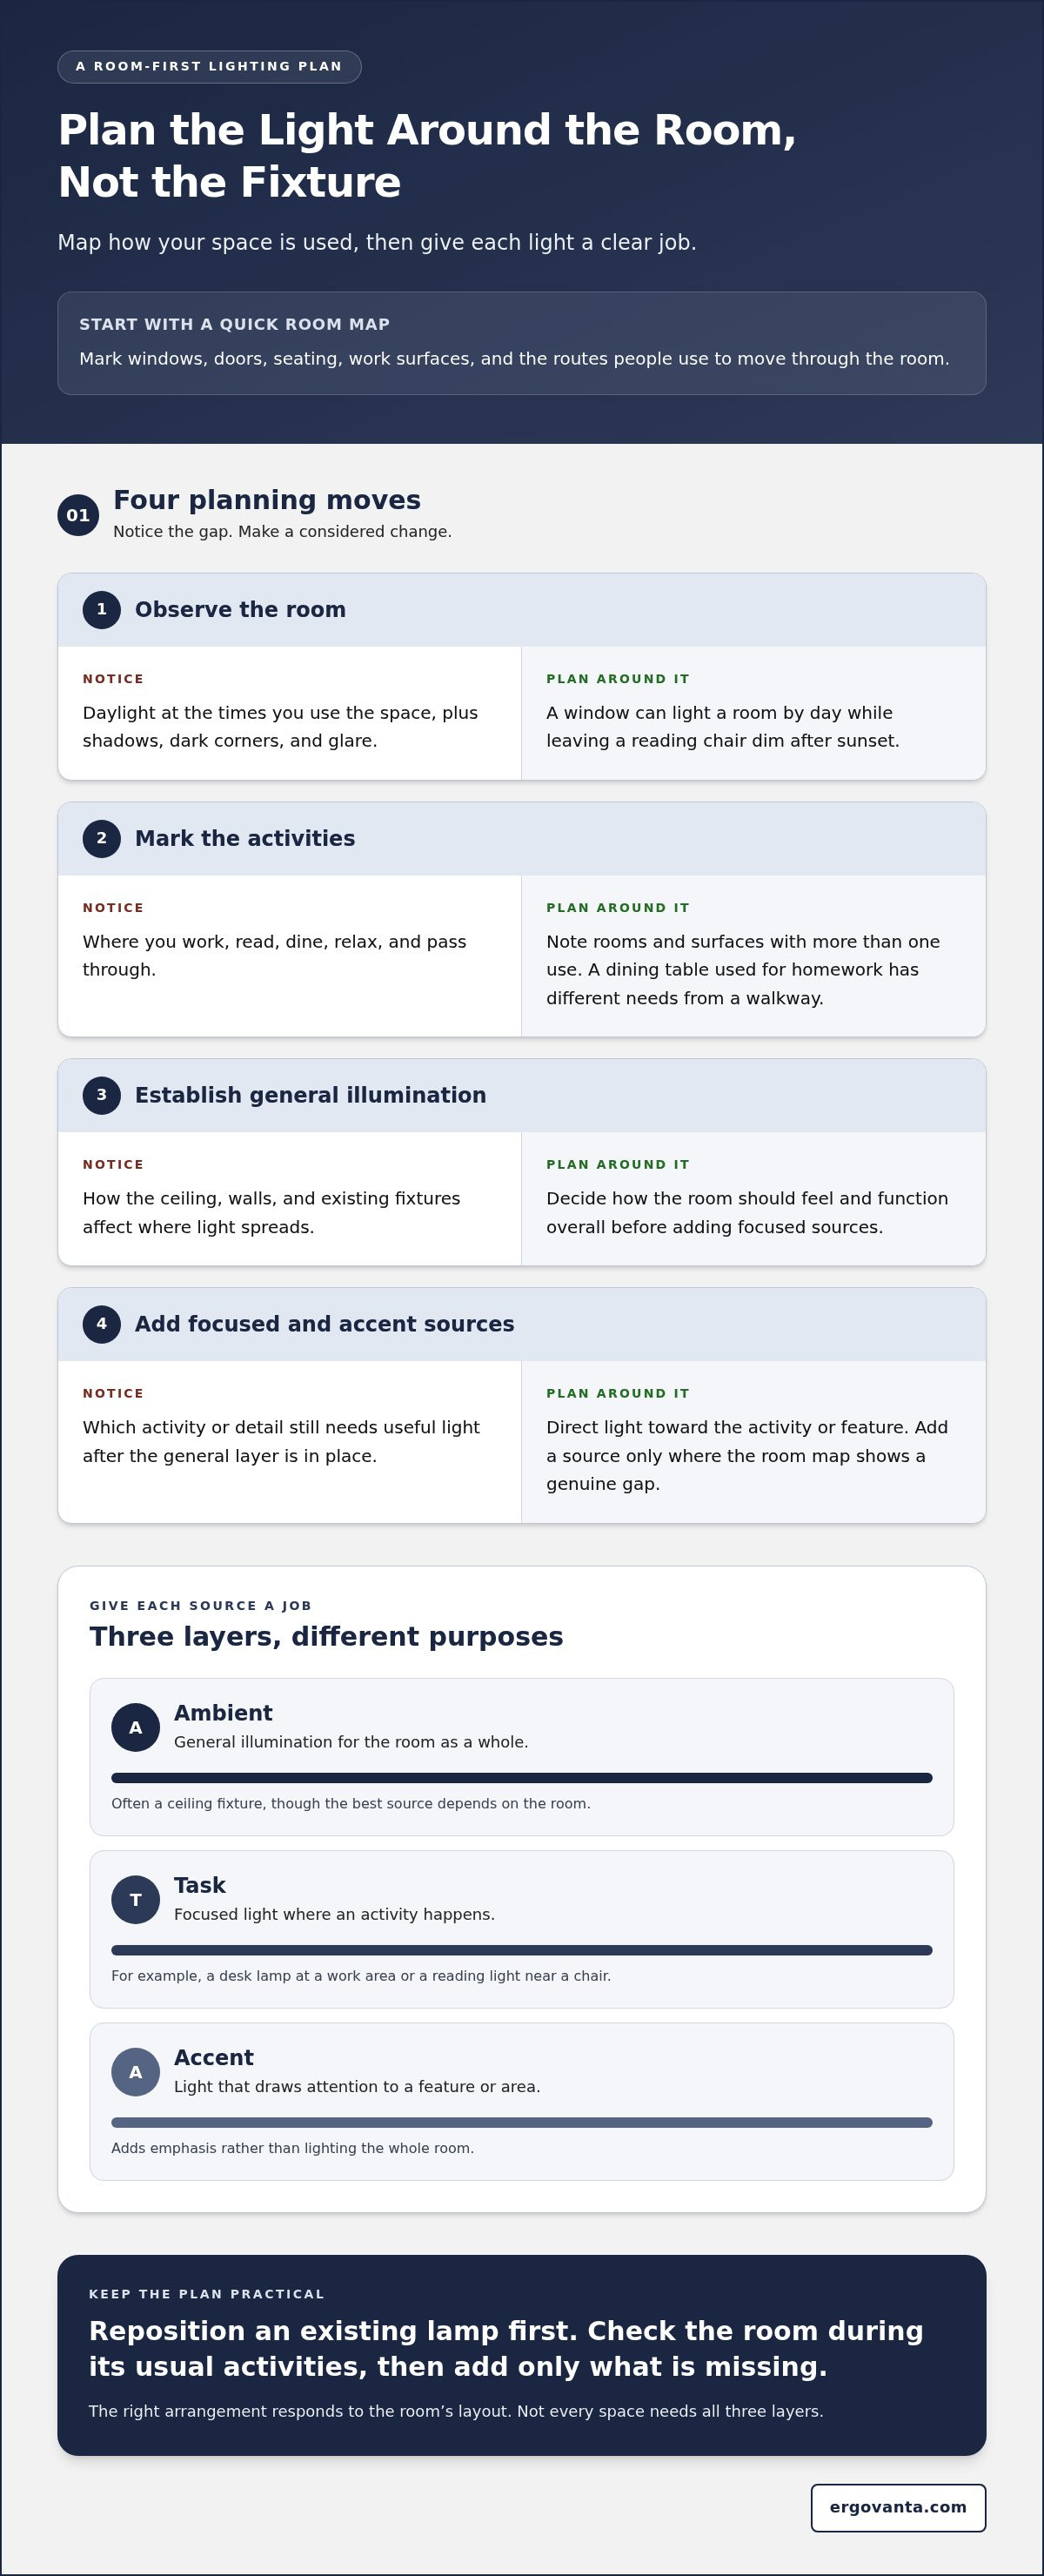
Ambient light is the room’s general illumination. It establishes the overall level of light, often through a ceiling fixture, though the best source depends on the room. Task light is focused where an activity happens, such as a desk lamp at a work area or a reading light near a chair. Accent light draws attention to a feature or area, adding emphasis rather than lighting the whole room.
One fixture can serve more than one role, and not every space needs all three. A small room used mainly for one purpose may work well with general light and a focused source. A room with artwork, shelves, or distinct activity areas might benefit from accent light too. Start with what the room needs, not a checklist of fixtures.
Why a single overhead light rarely does everything
A ceiling fixture sends light from one general position. The room’s shape and furnishings can leave some areas dim or create shadows where you need to see clearly. One overhead source may also make the room feel uniformly bright when you want a quieter setting. The fixture isn’t necessarily wrong; it’s just being asked to cover the whole shift.
Separate sources give you more choice. Use general light to move around, then switch on a desk lamp for focused work or a floor lamp beside a seat for reading. Accent light can bring attention to a corner or feature without making the entire room brighter. Explore lighting options across ceiling, wall, floor, and desk categories as you consider what role is missing.
Keep the plan specific to how the room gets used. A room that doubles as a work area and a place to unwind may need different light at different times. Layering makes those changes possible without insisting that every room needs every type of fixture.
How to Plan Home Lighting Layers Around the Room
Plan from the room outward, not from a fixture you happen to like. Before choosing or moving lights, notice where daylight falls, how the room is shaped, where furniture sits, and which areas feel dim. A quick sketch is enough. Mark windows, doors, seating, work surfaces, and the routes people use to move through the room.
Place each light where the room’s layout and the activity call for it. That rule keeps a lighting plan practical, whether you’re working with a large living room, a rented bedroom, or a corner that serves several purposes.
- Observe the room. Note daylight at the times you use the space, along with shadows, dark corners, and glare. A window may provide plenty of daytime light but leave a reading chair dim after sunset.
- Mark the activities. Identify where you work, read, dine, relax, or pass through. A table used for meals and homework has different needs from a walkway that simply needs to be easy to navigate.
- Establish general illumination. Decide how the room should feel and function overall. Consider how its ceiling, walls, and existing fixtures affect where light spreads.
- Add focused and accent sources. Direct light toward the activities or details that need it. Add a source only where the sketch reveals a genuine gap.
Start with daylight, layout, and everyday uses
Give daylight its own place on the sketch. Mark which areas receive window light and which sit farther away. Then draw the furniture as it’s actually arranged, not as a room plan would arrange it in an imaginary, unusually tidy life. A tall cabinet may block light from traveling across the room; a pale wall may help reflect it. Alcoves, long narrow layouts, and high ceilings can also change how light reaches different spots.
Label each activity area, including circulation paths. If the dining table doubles as a work surface, note both uses. This map helps you plan for the room you have, instead of choosing fixtures first and hoping they fit.
Build from general illumination to focused and accent light
Start by addressing the room’s overall light. Use the sketch to see whether existing ceiling or wall fixtures reach the areas you use. Then place task light at the point of activity: a desk lamp near the work surface, for example, rather than wherever an outlet makes placement convenient. Consider accent light where a feature or corner would benefit from attention. Depending on the layout and the effect you want, that could come from a wall light or floor lamp.
Work through the plan in stages. Reposition an existing lamp before adding another source, then check the room again during its usual activities. If you’re comparing fixture types, explore lighting across ceiling, wall, floor, and desk categories. You can also get in touch with Ergovanta to talk through your lighting choice.
Which Fixtures Work Best for Each Lighting Layer?
A fixture’s shape doesn’t decide its role. A ceiling light can provide general illumination or draw attention to a dining table. A floor lamp might support reading, soften a dim corner, or highlight a feature. Consider what the light does, where it lands, and how it fits the room before choosing by category.
Use this comparison as a starting point, not a fixed recipe. The same fixture can serve different purposes depending on its position and direction.
| Layer | Common fixture types | Purpose | Placement consideration |
|---|---|---|---|
| Ambient | Ceiling lights, chandeliers | Provide general light for moving through and using the room. | Consider how ceiling height, room shape, and surfaces affect where the light spreads. |
| Ambient or task | Pendants | Offer general light or focus attention over a specific area. | Position in relation to the table, counter, or other area below. |
| Task or accent | Wall lights | Add light from the side, support an activity, or draw attention to a feature. | Consider what the light will reach and whether nearby furniture or artwork will cast shadows. |
| Task or accent | Floor lamps | Bring light beside a reading seat or add emphasis to a corner. | Place close to the intended area without obstructing movement. |
| Task | Desk lamps | Focus light on a work surface or other specific activity. | Position to light the work area while avoiding glare and unwanted shadows. |
Match fixtures to their roles
Ceiling fixtures often establish a room’s general light, while a pendant can mark out a table or another focal area. Explore ceiling lighting options with the room’s layout in mind. Wall lights add a useful side layer, especially where a ceiling source leaves a wall or feature visually flat. Floor and desk lamps are easy to reposition, making them practical choices when the activity or furniture arrangement may change.
Treat each fixture as a tool rather than assigning a permanent label to its type. A floor lamp aimed toward a wall can contribute softer, more general light; aimed toward a chair, it can support reading. The result depends on placement and direction.
Choose placement and direction before adding fixtures
Notice where the beam lands. Does it reach the desk, book, or table, or spill into your eyes? Does a chair or shelf cast a shadow across the surface you use? Shift the lamp or change its angle before assuming you need another light. A well-placed source can solve a problem that an extra fixture would merely join.
Floor lighting can help address a dim seating area or add light from a lower position. Whatever type you consider, keep pathways clear and check the effect from where you sit, stand, and work. Build the plan around the room’s actual use, then let each fixture earn its place.
How to Adjust Layered Lighting for Different Activities
Good lighting should keep up with the room. Use the space as you normally would, notice where light feels too dim or causes glare, then adjust one source. Move a lamp, change its direction, or switch off a layer. Check the result before changing anything else. One adjustment at a time makes it easier to tell what’s helping.
Different activities call for different combinations. Reading needs light near the page; cooking needs clear visibility across the work surface; working calls for focused light that doesn’t reflect into your eyes. Conversation may feel better with less general brightness, while winding down often calls for a softer overall effect. The right setting is the one that suits your routine, not a rule borrowed from someone else’s living room.
Use room-by-room examples without prescribing one style
In a living area, use general light to make the room easy to move through, then add a reading lamp beside a chair. For entertaining, reduce task-focused sources and keep enough light for conversation. In a kitchen, combine overall illumination with focused light where food preparation happens. In a bedroom, general light can help with getting dressed, bedside light can support reading, and a decorative source can bring attention to a feature. Your layout and habits decide which sources earn a place.
Explore lighting for different rooms to compare fixture categories, then ground the decision in how each room is used. A bedroom that also serves as a workspace, for example, may need a separate focused source rather than a brighter version of every light.
Fine-tune brightness, bulb appearance, and control
Set brightness by the task and the room. A surface used for detailed work may need more focused light than a room used for quiet conversation. If the room feels glaring, try lowering the source’s brightness or changing where it points before adding another lamp. Bulb appearance matters too: warmer-looking light often feels gentler for unwinding, while cooler-looking light can feel clearer for focused activity. There’s no single choice that suits every room or person.
Controls make those choices easier to repeat. Separate switches let you use a desk lamp without turning on the full room, or keep a decorative source on while switching off task lighting. Dimming can also help a source serve different activities when the fixture and its controls support it. You don’t need complicated settings. A simple way to switch layers independently can make a room more adaptable.
Keep a short note of what you changed and how it felt during the activity. That turns trial and error into a useful routine and helps you decide whether the room needs a different setting or a different source.
Build a Layered Lighting Plan That Feels Like Your Home
A useful lighting plan doesn’t start with a shopping list. Start with one room and the sources already in it. Keep what works, reposition what doesn’t, add only where there’s a clear gap, then test the change during an ordinary day. That’s how to layer lighting in your home without turning every dim corner into a reason to buy another lamp.
Create a simple lighting audit before making changes
Write down what’s in the room and what each source currently does. Include ceiling lights, wall lights, floor lamps, desk lamps, and daylight from windows. Then mark the spots that feel too dim, too bright, or awkward to use. Be specific: perhaps the desk is shadowed, the sofa feels gloomy for reading, or a light catches your eyes while you’re seated.
Choose one issue to address first. A small change is easier to assess than rearranging the whole room at once. Use this quick audit:
- Keep: Note sources that serve their purpose comfortably.
- Reposition: Move a lamp or change its direction to improve where light lands.
- Add: Consider another source only if a real need remains.
- Test: Use the room as usual and notice whether the change helped.
This works whether you own your home or rent it. A lamp moved closer to a chair may be more useful than a new fixture, and it doesn’t require a grand plan or a dramatic reveal.
Choose additions that earn their place
Before adding a light, compare it with the simpler options: repositioning an existing source, changing which lights you use together, or aiming a lamp toward a wall instead of directly at a seating area. If none solves the problem, choose a fixture for the job it needs to do. A desk lamp can serve a focused work area; a floor lamp may bring light beside a chair or into a darker part of the room.
Then consider how its form, material, and placement fit the room. A fixture can be useful without matching every other object, but it should make sense where it lives. Think about walking paths, nearby furniture, and what you see from your usual seat. The best choice is not automatically the most noticeable one.
Ergovanta’s ceiling, pendant, wall, floor, and desk lighting categories offer different forms to consider as you build your plan. Treat them as possibilities, not a checklist. A room might need only a better-placed lamp; another may benefit from a new source that fills a specific gap. Keep the result personal, practical, and made for the way you use the space.
Make one change, live with it, and adjust if needed. Your lighting plan doesn’t have to be finished in a day. It just has to work a little better for the people who use the room.
Make Your Next Lighting Choice Count
Your lighting plan can take shape one decision at a time. Pick a room you use every day and notice what would make it work better: a clearer work surface, a calmer place to unwind, or light that reaches the corner you keep avoiding. Let that real need guide your next move, whether it’s adjusting what you own or choosing a new source.
Learning how to layer lighting in your home isn’t about following a formula. It’s about building a setup that fits your routines and feels right in your space. Start small, pay attention to how the room feels, and let the plan grow with you.
A room doesn’t need to be finished all at once. Make one considered change, then enjoy the difference it makes.
Frequently Asked Questions
What are the three layers of lighting in a home?
The three common layers are ambient, task, and accent lighting, named for the job each source does. To identify a source’s role, notice what changes when you switch it on: does the whole room become easier to see, does one activity become clearer, or does a detail stand out? This quick check helps when a fixture serves more than one purpose, which happens often.
Do you need all three layers of lighting in every room?
No. Let the room’s regular use set the priorities. If a space serves several purposes, decide which activity needs the most reliable light and make sure it’s covered before addressing occasional uses. For example, in a guest room that’s sometimes used for crafts, extra focused light may matter only during those projects. The plan can stay simple until the room’s needs change.
How do you layer lighting in a small room?
Begin with the activity that matters most, then look for ways to use vertical space. A lamp that directs light toward a wall can brighten the room without taking up another spot on a crowded surface. In a small room with a mirror or screen, check the view from where you sit so reflected light doesn’t become distracting. Keep circulation clear; a fixture shouldn’t make the room harder to use.
Can you layer lighting without changing the ceiling fixtures?
Yes. Keep the existing ceiling fixture and use other sources to fill a specific gap. A plug-in desk lamp, for example, can focus light on a work surface without changing the room’s fixed lighting. If you want to use one source without switching on another, consider how the lights are controlled in your space. The practical test is whether you can choose the light you need independently.
What is the difference between ambient and accent lighting?
Ambient lighting supports visibility across a room, while accent lighting draws attention to a particular feature or area. To tell them apart, switch off other sources briefly. If the light mainly helps you see the room as a whole, it’s serving an ambient role. If it makes one detail stand out, it’s acting as accent light. A fixture’s purpose can shift with its direction.
How can you make layered lighting feel cohesive?
Check how the lights work together from the places you enter and spend time. A cohesive setup doesn’t require matching fixtures; it benefits from a clear visual order. Choose which area should draw attention first, then make sure other sources support the room rather than competing for notice. If one fixture feels disconnected, try changing its direction or position before replacing it. Practicality can look considered, too.
Disclaimer
Ergovanta publishes these guides to help people set up better workspaces. Product recommendations reflect what we sell. Specifications, prices and availability are accurate at the time of writing and may change. Nothing here is medical, ergonomic or professional advice; if you have a specific health concern about your workstation, speak to a qualified professional.
From the catalog